Regular descaling is an essential part of Keurig maintenance, but it can be frustrating when that light won’t turn off or keeps coming back no matter what you do.
It’s possible that your machine’s computer doesn’t realize you’ve descaled it. It’s also possible some particularly stubborn particles have taken up residence somewhere deep inside it.

In this guide, we’re going to look at some common issues that may be keeping your descale light on. Whether it’s a software problem or a physical blockage, the tips in this article should help you get to the bottom of whatever’s preventing your Keurig from brewing.
Why Is The Descale Light On And Won’t Brew?
The descale indicator lights up on your Keurig whenever too much gunk builds up inside its tubes and hoses. This gunk is usually some kind of mineral deposit left behind by hard water, but it can also be loose coffee grounds, dirt, air bubbles, or other tiny particles.
Keurig machines can’t tell you what’s clogging their innards. They only know that the flow of water has slowed down too much for the brewing process to work properly.
You can look for problem signs like sediment sloshing around at the bottom of the water in your reservoir or layers of white residue accumulating around the sides. This chalky gunk is known as limescale, and it comes from trace minerals in your hard water supply.
Limescale build-up is the most common reason the Keurig descale light turns on. If you have a lot of build-up, you can descale your Keurig’s using their descaling solution and our descaling guide to get rid of it quickly.
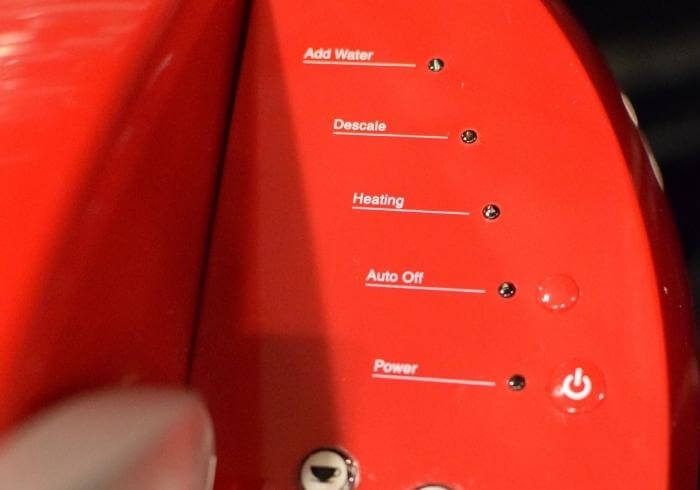
If you’ve already tried descaling your machine, but the light still won’t turn off, you may have a model with an official Descale Mode. If so, you’ll need to activate the Descale Mode to let the machine know that it is officially being descaled.
How To Turn Off Descale Light On Keurig
Equipment
- 1 Coffee mug
- 1 Keurig Coffee Maker That has the descale light on that won't go off.
Ingredients & Supplies
- 1 unlimited Cold Water
- 1 Bottle Keurig Descaling Solution (optional)
Instructions
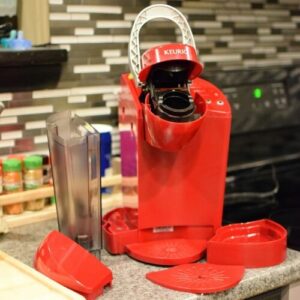
- Turn your Keurig off, and pull its plug.
- Take out the water filter and any coffee pods left inside.
- Put your coffee mug on the tray where it usually goes. It will catch the water or used descaling mixture.
- Plug your machine back in, but don’t turn it on quite yet.
- Activate the Descale Mode by holding down your machine’s 8-ounce and 12-ounce buttons at the same time for three seconds. The machine will power up, and the brew button should start flashing. If your descale light was flashing, it should turn solid.
- Now your machine is in Descale Mode, and it expects to be descaled. If you haven’t descaled in a few months, use your bottle of descaling solution, and refer to our guide on how to descale a Keurig to complete the process.
- If you’ve descaled it recently, you’ll still need to brew through two full reservoirs of water before the light turns off. Fill your reservoir with water, and press the flashing brew button.
- Wait till the coffee mug is full of water, and then empty it. Put the mug back, and press the brew button again.
- Keep running brews until the light blinks on, telling you to add water. Fill the reservoir again, and repeat the above step until the ‘ADD WATER’ light comes on for a second time.
- Once you’ve finished cycling through two full reservoirs, your Keurig should exit Descale Mode, and the light should finally turn off.
Keurig Duo Descale Reset
If you have a Keurig Duo, getting the light to turn off will be slightly different. The Duo has both a single-serving coffee dispenser and a carafe. You should descale both before resetting the light manually. Please refer to our descaling guide for more information.
Directions
- Turn off your Duo.
- Find the 8-ounce and 10-ounce buttons, and press them both at the same time.
- Hold them down for three seconds, and then release them both.
- The descale indicator light should go off.
What To Do if the Descale Light Keeps Coming on
Gunk build-up isn’t the only thing that can turn your descale light on. Here are a few more common problems and how to deal with them.
Packed Pods
If you use refillable coffee pods, it’s possible you’re refilling them too much. When you pack too much coffee into a pod, the water can have a hard time getting through, which can trigger your descale alert.
We recommend you refill your pods loosely, don’t fill them all the way to the brim, and never pack the coffee grounds down so you can fit more in.
If you think your problem may have come from a tightly packed pod, try taking out the pod to check if your machine lets you run a pod-less brew cycle.
Related | Can You Reuse A K-Cup More Than Once?
Clogged Needles
Next, check if the entrance and exit needles are stopped up. The entrance needle is under the brewer’s head, right below the brew handle. The exit needle is on the bottom of the pod holder.
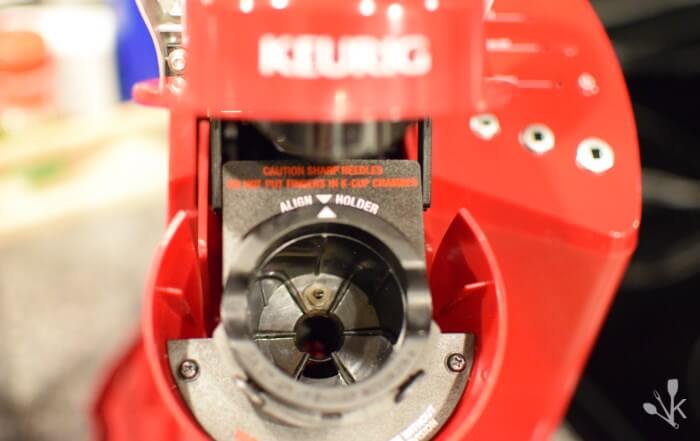
Unplug your machine, and lift the handle. You should see the entrance needle right under the head. It has two small holes, so make sure to unclog them both. You can use a safety pin, a needle, or a straightened paper clip.
Next, remove the pod holder, and take the funnel off the bottom. You should see a tube sticking out from the underside of the pod holder. Use your paper clip, safety pin, or needle to clear out anything clogging the tube. Rinse the pod holder and funnel with tap water to clear out any particles you may have loosened.
Plugged Tubes
If all else fails, you may have some stubborn air bubbles or dirt particles lodged in your Keurig’s guts. You can coax them out by giving your machine a light spanking.
Unplug it from the wall, remove the reservoir, drip tray, filter, and any coffee pods inside. Hold your Keurig over your kitchen sink and give it a few firm slaps on its side and base.
This gentle Keurig-quake should work to dislodge anything that might have gotten stuck in the tubes. Finish by running a brew cycle with pure water to rinse out whatever was blocking your water flow.
How To Prevent The Light From Coming On Again
If you use tap water in your Keurig, it’s normal for limescale and foreign particles to build up slowly inside the tubes and tank.
You can keep build-up to a minimum by using a water filtration unit on your tap, but you’ll probably still need to descale regularly.
Keurig recommends you descale their machines at least every three months.
Related | How To Use A Keurig
In Summary
If descaling your Keurig didn’t turn the light off, you may have to put your machine in Descale Mode before it recognizes that you’ve cleaned it.
Also, make sure you aren’t overfilling your refillable coffee pods, and keep your entrance and exit needles unclogged by cleaning them with a paper clip.
Once you’ve used the tips in this article to get that light off, the best way to keep it off is to use a water filtration unit and descale the machine every three months.