If you’re like most people, your mornings wouldn’t be the same without a cup of coffee. And if you rely on your Keurig to make your morning cup of Joe, then you’re likely well aware that a machine that doesn’t power on can be incredibly frustrating. So what do you do when your Keurig won’t turn on?
If your Keurig is not working, you will need to verify that it’s not physically damaged, such as the power cord, check that your power outlet is working or plug the unit into a different one, and follow some basic troubleshooting steps to get you brewing again.
In this guide, I’ll explain basic steps that you can try before contacting Keurig Support. There is one step for more advanced users who are comfortable with electronics, but please check your warranty to ensure that it won’t be avoided when disassembling your unit.
First, we will cover general troubleshooting for a Keurig that won’t turn on, but if you own a K-Supreme and have descaled it before it stopped working, skip to the section below about descaling.
Reasons Why Your Keurig Won’t Power On
Here are a few reasons why your Keurig won’t power on, such as:
- Your power source is not working
- A bad power cable
- The power switch is broken
- The screen or buttons are broken
- The thermostat needs to be reset
- Internal electronics are damaged
- The machine was dropped or submerged in water
Before you try figuring out how to replace electronic parts, let’s go over some basic troubleshooting steps to see if that does the trick to get you back to brewing.
Troubleshooting Steps For A Keurig That Won’t Turn On
1. Check The Power Cord
First, check to make sure that your power cord has not been damaged. If you have pets, it should be easy to see if one of them has been gnawing on it.
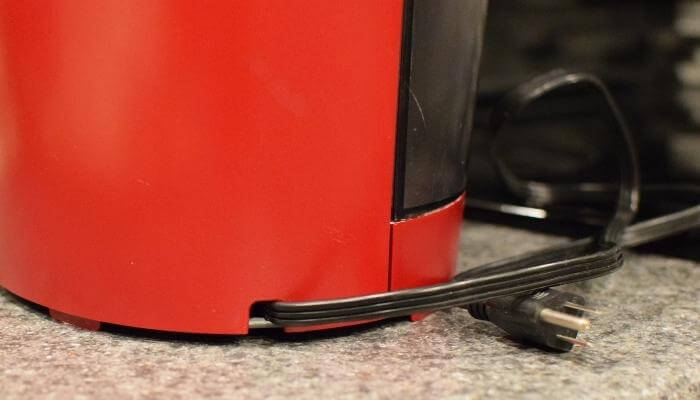
However, cords and cables sometimes become damaged on the inside due to constant bending and flexing. So you can also try plugging it into a different outlet.
2. Check Your Power Source
Another thing to check is that your power source hasn’t tripped its breakers, such as a surge protector or GFI outlet. If so, it will need to be reset. However, you should also investigate why it tripped in the first place.
If you’re using an extension cord, try plugging the Keurig directly into the wall outlet.
3. Make Sure All Parts Are Seated Correctly
If you haven’t cleaned your Keurig in a while, this is a good opportunity to do so. I recommend unplugging it and taking it apart, starting with the water reservoir and drip tray if those can be detached.

Don’t forget to empty water from your Keurig before you start removing parts.
While those are soaking, inspect and clean the K-CUP holder and needle. Try closing the holder to see if it looks right and closes properly. It’s possible something has become misaligned.
When putting your Keurig back together, double-check to make sure everything is seated correctly. If you have to really force it or hear crunching sounds, something is obviously wrong. Consider reviewing how to work a Keurig if it’s been a while or your first time.
A less likely scenario is that one of the internal parts has become loose. This is usually only an issue if your Keurig was dropped or handled roughly, but it’s still something to check if you have the technical know-how to do so.
That would require you to unplug the machine and open it up. Once inside, check that all the cables are properly seated in their connectors.
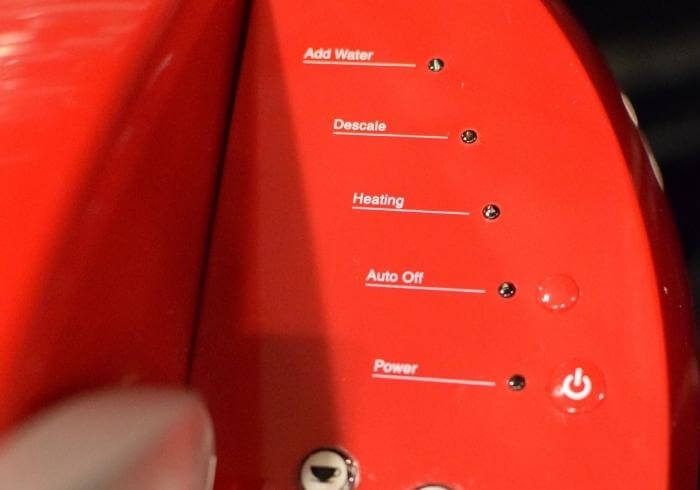
4. Reset Your Machine
Once your Keurig is back together and still not turning on, you can perform a reset.
In general, you will need to unplug your machine and wait for a few minutes, remove the water reservoir, plug the machine back in, press the power button, put the reservoir back in place, and then open and close the K-CUP Holder.
Some models require you to press and hold the power button, so you’ll need to double-check the procedure for your model, which can be found on the Keurig Support Website.
5. Contact Technical Support
For most users at this point, there isn’t much else you can do other than contact Keurig.
I believe their support is quite helpful and should be able to help you navigate the problem further. Or simply have the machine replaced, hopefully under warranty.
Why Won’t My Keurig Turn On After Descaling?
In a recent class action lawsuit, it was revealed that many Keurig machines have a design defect in the instructions that can cause them to break down after being descaled.
The affected models are the Keurig K-Supreme coffee makers.
This is a serious issue, as descaling is an important part of keeping your Keurig in good working condition. So, if you’ve descaled your Keurig and it won’t turn on, keep an eye on the class action lawsuit and settlement at ClassAction.org.
If you have another model that appears to be caused by descaling and you’ve tried our troubleshooting tips, you’ll need to contact Keurig for support.
How To Reset The Thermostat In Your Keurig
This section is not for everyone, and honestly, it shouldn’t have to be done by you. The process of resetting the thermostat requires you to disassemble the whole machine to get access to the reset switch.
Here is an awesome YouTube video by Just A Dad Videos that walks you through the process step by step.
Final Thoughts
Hopefully, one of these steps will get your Keurig up and running again!
If not, it may be time to contact Keurig for support or look into getting a new machine.
Keurig’s are awesome coffee makers, but they are still machines that will break down over time. So, don’t be too hard on yourself if you can’t get it working again.