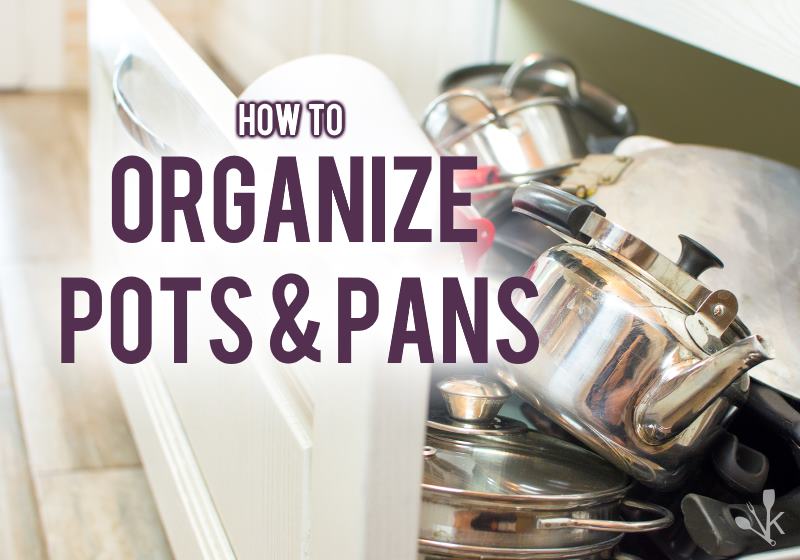
Pots and pans were a product you could buy once and forget about but warnings on nonstick coatings have many of us studying the condition of our cookware and worrying.
The points below on how to organize pots and pans in your kitchen will give you damage to watch for and great ideas for protecting a new set of cookware.
1. Stackable Cookware Organizers
When arranging your cookware, it’s critical to avoid any metal contact with the inside of the cooking pan, so nesting is out.
Some cooks like to stack their nonstick cookware from smallest to largest, creating a rather wobbly tower.
If your cookware has a protective rim at the top of the pan, this is a decent option, but if not you may start damage there that will ultimately impact the usefulness of the pan.
There are many vertical storage tools available for cookware, such as the Deco Brothers Organizer Rack.
Many of these products will work as free-standing units or can be mounted inside a cabinet for stability.
This particular unit can also be mounted horizontally, to stand pans on their edge.
Deco Brothers Organizer Rack | Editor Recommended

Pros:
- Separates pans and protects their interiors
- Can be mounted to avoid tipping over
- Can place multiple pans in a small footprint.
Cons:
- Gaps may not work with all cookware; cast iron owners may be disappointed
- Won’t handle heavy pans unless mounted
- Rack is metal and may contact cooking surface if improperly placed. Be sure you have direct access; that is, straight in and straight out
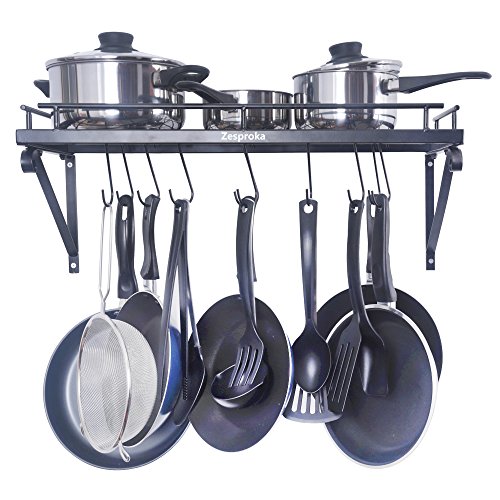
2. Hanging Pots and Pans
If cabinet space is limited, consider investing in a hanging organizer such as the Zeproska Wall Pot Rack.
Hanging organizers are easy to load and most come with adjustable hooks to avoid banging your pots and pans together.
Zeproska Wall Pot Rack | Editor Recommended
Pros:
- Saves cupboard space
- Makes selection and cleanup easier; no need to rearrange anything to put pans away
- Avoids stacking damage
Cons:
- Pot racks can collect greasy dust
- Pots and pans are heavy; mount with care!
- Your cookware may require some cleanup before it can be displayed
New cookware lines give home cooks the chance to add to their decor with a beautiful pot rack and beautiful pots and pans.
There are also pot racks that include a light fixture or can be mounted below a light fixture or from the ceiling. This is an ideal setup if you have an island. The linked unit is wall mounted and includes a shelf for extra storage.
3. Pots and Pan Cabinet Organizer With Slider
Pull out organizers are a great investment if you have the cabinet space, particularly if you’re tall and don’t care to get down on the floor every time you need something from a bottom cabinet.
These organizers, such as the Rev-A-Shelf 2 Tier are generally designed be mounted both to the sides and the floor of the cabinet.
Be sure to follow instructions and mount it correctly; if it flexes or get bent once it’s loaded, the sliders may stick.
Rev-A-Shelf 2 Tier| Editor Recommended

Pros:
- Easy to load and unload; racks pull out separately
- Plenty of internal height in the rack for handles
- Adjustable bottom rack for casseroles, lasagna pans, and stew pots
Cons:
- Many portions of this rack are adjustable before you mount it, so customize first, then screw it in place
- This will take up an entire base cabinet
- If things fall behind the rack, you may have to completely unload it to remove them
A pull out slider is an excellent choice for stock base cabinets.
If your home is older and your cabinets are “stick-built” or built-in place, do your homework and measure with care so you can be sure your slider will fit and work properly.
Once properly installed, these tools offer great protection to your pots and pans.
The slots on the bottom are adjustable, so you can place both low profile saute pans and larger casserole pots in this rack.
Be aware that you can adjust the space between the bottom rack and the top rack. This is required before you mount it.
Damaged Cookware
Storage is critical! Stacking or nesting your cookware is an easy way to ding up your pots and pans whether they’re non-stick or cast iron.
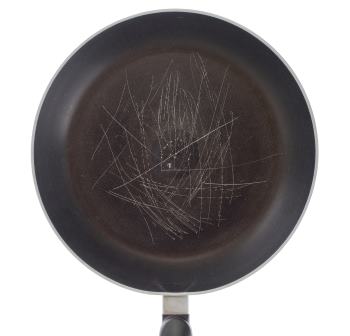
Experts with Epicurean recommend the avoidance of all metal utensils. These tools will damage a non-stick pan. They can also ding up the finish on aluminum and enamel.
Once your non-stick has a scratch, it will get worse. Experts disagree about the dangers of these materials if ingested or infused into your food, but be aware that a scratched non-stick pan is unsalvageable and needs to be replaced.
Good Housekeeping recommends replacing your non-stick cookware every three to five years. With each new pan, consider investing in a new non-stick safe cooking tool, such as a nylon flipper or plastic tongs.
When cleaning any pan, avoid a lot of scrubbing and scouring. If something is burned on, try scraping it away with a plastic tool, a wooden scraper or a copper scrubbing pad.
Avoid using steel scrubbers on softer metals (such as aluminum or non-stick finishes) to avoid scratches, pits and dings in the cooking surface. These breaks in the surface will cause hot spots and be the first place to burn the next time you use this pot.
Tips for Small kitchens
If your kitchen is especially small, the first item to consider is buying with care.
For example, one non-stick skillet with a helping handle opposite the long handle and a tight-fitting lid can serve several purposes but requires little space.
If you’re buying small, buy heavy. A heavy bottomed pot will cook more evenly and last longer.
Try to buy multi-purpose tools. While a cookware set is nice, you can fry in a wok and saute in a non-stick casserole dish. Be sure to purchase cookware with a high heat tolerance so you can move easily from cooktop to oven.
While most non-stick cookware has a high oven tolerance, the lids may only go to 350 degrees Fahrenheit / 177 degrees Celsius.
Finally, if you have space to store your one good pot, store it with the lid in place. This will protect it from being scratched.
Final Thoughts
New cookware is fun and pretty, but it can get expensive to replace scratched pans. Treat them kindly.
Never plunge a hot pan into water. This action can cause warping which will damage the pans surface and ultimately cause scratching when stacked.